For the majority of participants, this is the key place to start
We spend much of our time in Microsoft Outlook and as it synchronises with other tools, it’s worth investing some effort to optimise it. While most users are comfortable with email and calendar functionality, there is so much more in Outlook to support our busy work.
Watch the videos or use the guide below to fine tune your system. If you have attended the live sessions, use the material as a reminder to help further embed the programme.
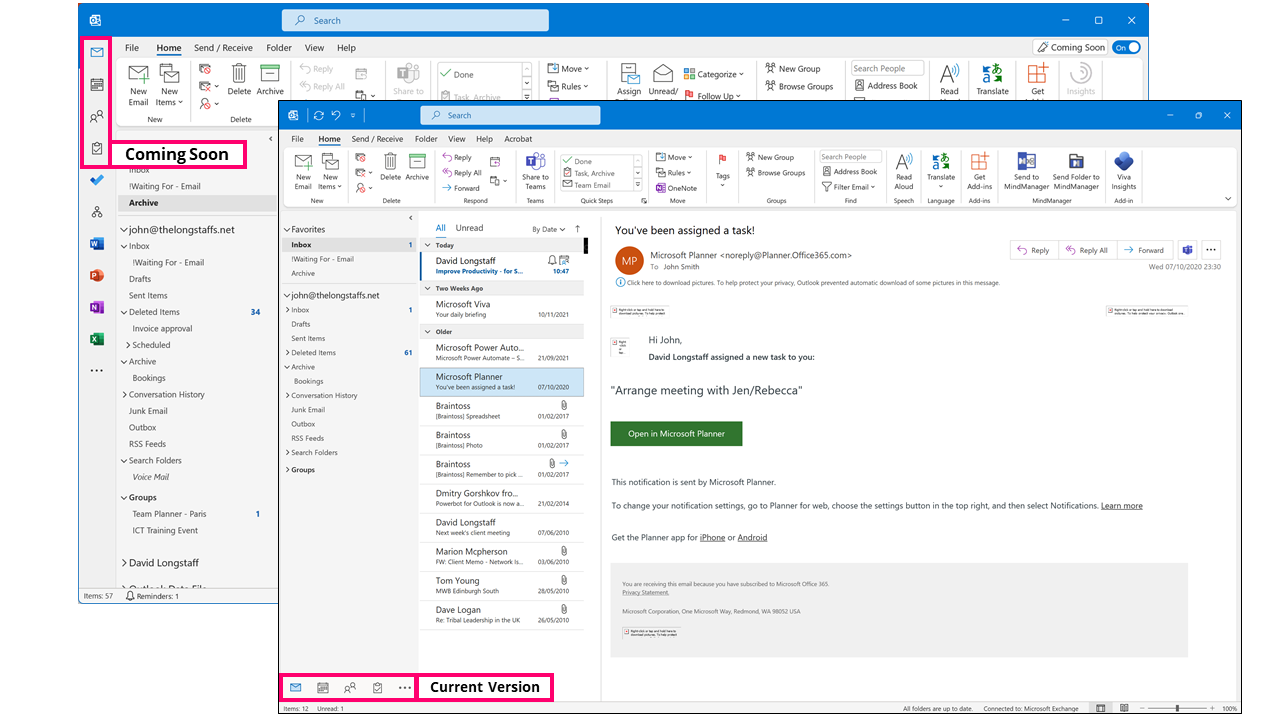
A note on Outlook versions for Windows
Microsoft is making updates to the Windows Outlook client. The changes aren’t complicated but to cover all bases, this page includes both current and coming soon options:
1) The videos and Quick Guide are based on the current version of Microsoft Outlook and will work even if you use older versions (2007, 2010, 2013, 2016 or Microsoft 365).
2) The article below uses minor changes that some users will see as “Coming Soon”. The only major change is the navigation icons have moved from the bottom left (horizontal) panel of the application to the top left (vertical).
To access Outlook tasks, use the task icon in Outlook, which is the tick inside a clipboard (Image 1.1); the blue tick is Microsoft To Do, an app that synchronises with Outlook tasks.
The left-hand navigation panel, under the My Tasks header, will offer at least two options; To Do list and a Tasks folder (Image 1.2). There may be additional task folders especially if you have shared mailboxes. The To Do list displays tasks and flagged emails.
Pro Tip
It is worth clearing out ‘dead’ items before setting up. To do this, select the non-relevant and old items and choose “Remove from list” (Image 1.3) on the top menu – be aware this will delete old tasks and remove flags from emails.
The To Do list view can be changed by selecting the “View” tab (Image 2.1) then “Change View” (Image 2.2). The “Active” view (Image 2.3) is often useful, which can be adjusted to arrange by Folder (Image 2.4).
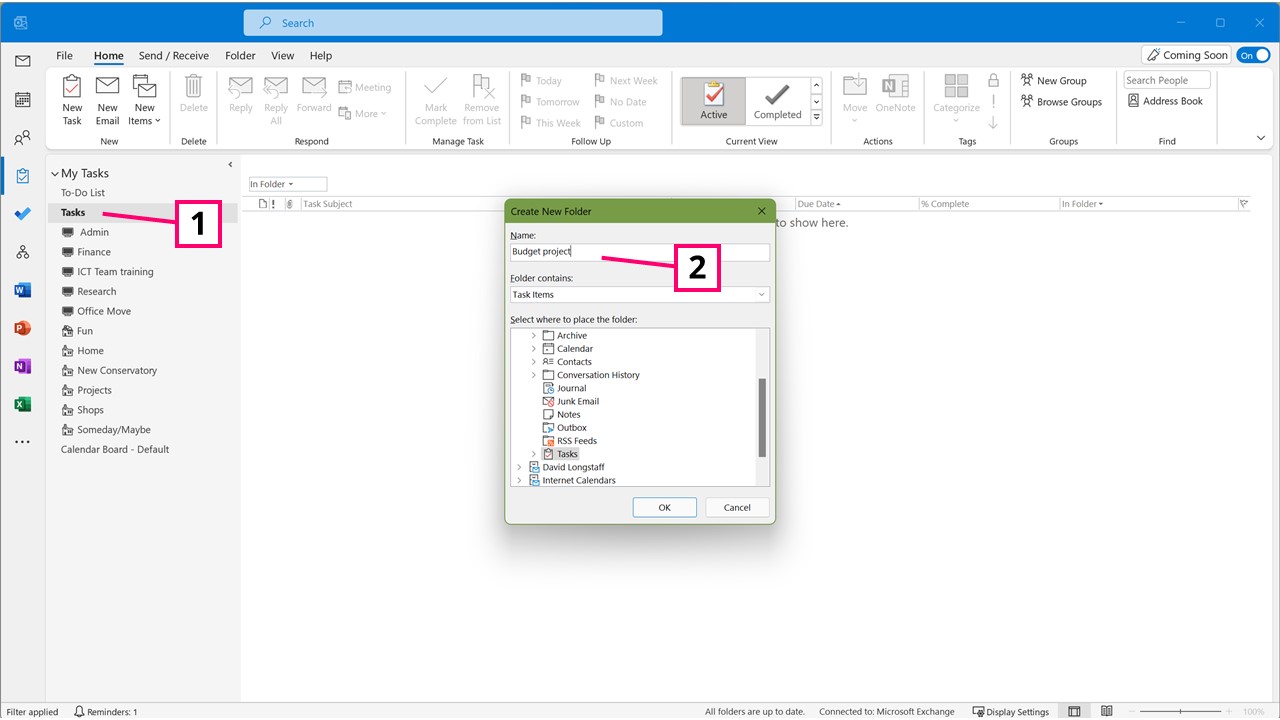
I recommend creating a few folders under the root tasks folder for your mailbox. These folders can be based around your projects or key areas of work. In the first instance, just create two or three in case you decide to change the structure later. To create these, right click the tasks folder for your mailbox (Image 3.1), and choose new folder (Image 3.2). These folders will be displayed on the left hand navigation panel and dragged around to reorder them.
These folders are now also synchronised with Microsoft To Do lists.; more on that to follow.
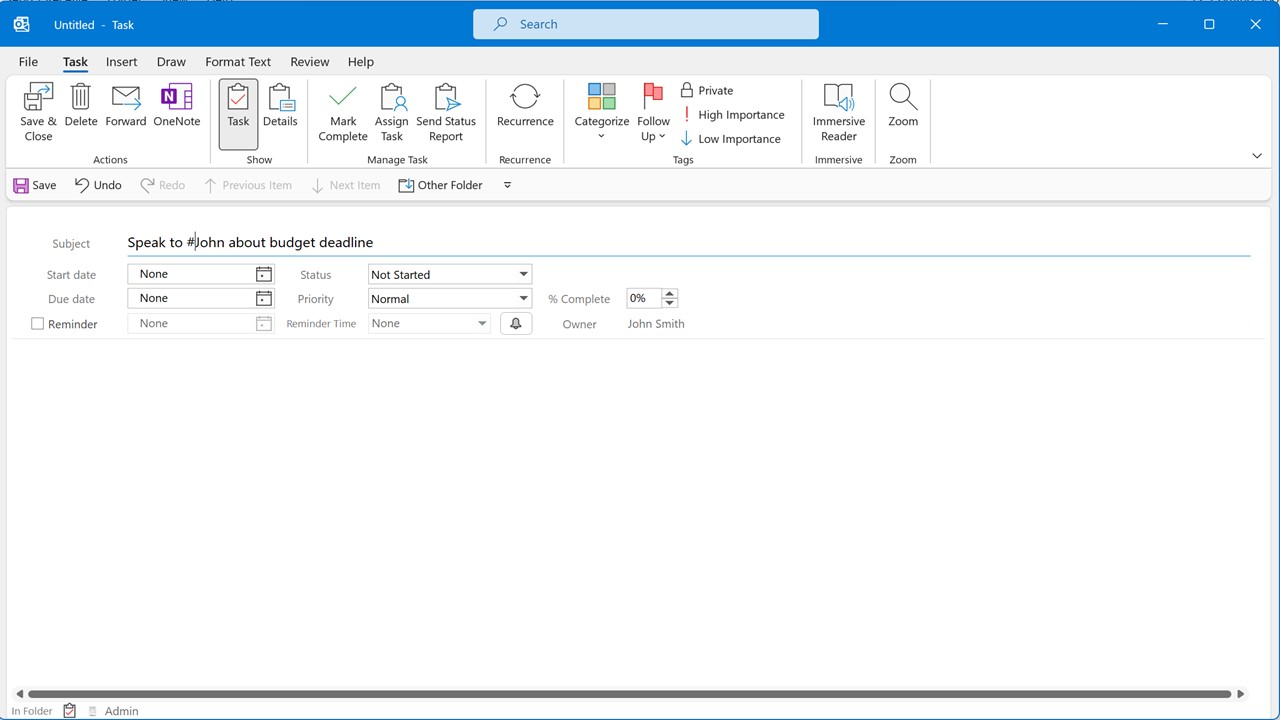
Click into one of your new folders and now create a task (Image 4). When creating a new task, as discussed earlier in the programme, ensure every task has a clear subject line that doesn’t require you to rethink the task if you have to review it 2 weeks’ later. You can also include any due date and reminder, change its priority and mark it as private. Generally speaking, tasks are not shared with others, and so you wouldn’t need to mark a task as private, however, there may be a benefit if you use tasks with the calendar (see below).
Select save and close and you will now have your first new task in that folder. I suggest quickly repeating the process to create a few more.
3) Making Emails into Tasks (and Appointments)
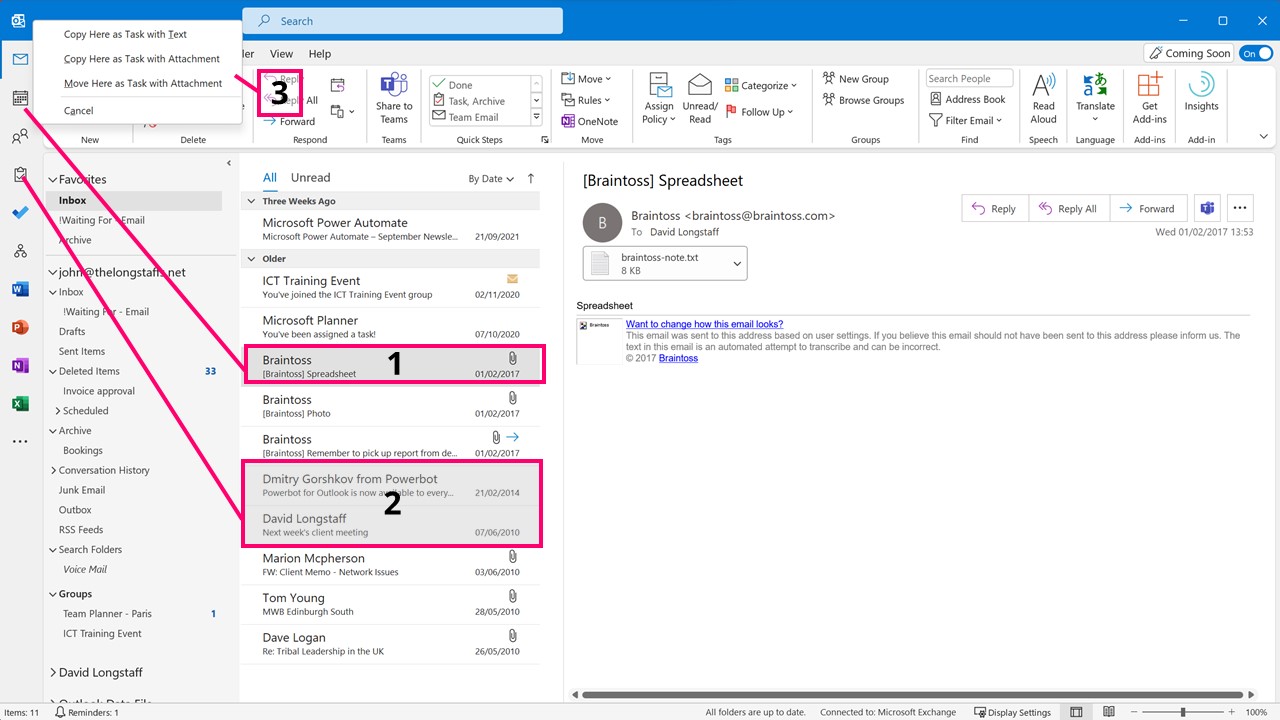
To convert an email to a task, simply drag the email to the task icon or calendar icon on the Navigation Pane (Image 5.1).
If you want to select multiple emails, hold the ‘Ctrl’ key down and click on the specific emails to select them. Then hold the right mouse button down as you to drag them to add the selected emails to a single task or appointment (Image 5.2).
Holding the right mouse button down also will allow you to take the any attachments into the relevant task or appointment (Image 5.3).
Pro-Tip
By default, the new task is saved to the root task folder. Instead, you can save it to the appropriate folder by editing the Quick Access Toolbar (Image 6.1) and adding the option “Move to Other Folder” option. Using this new button instead of the traditional Save and Close option, will save the task into its relevant folder.
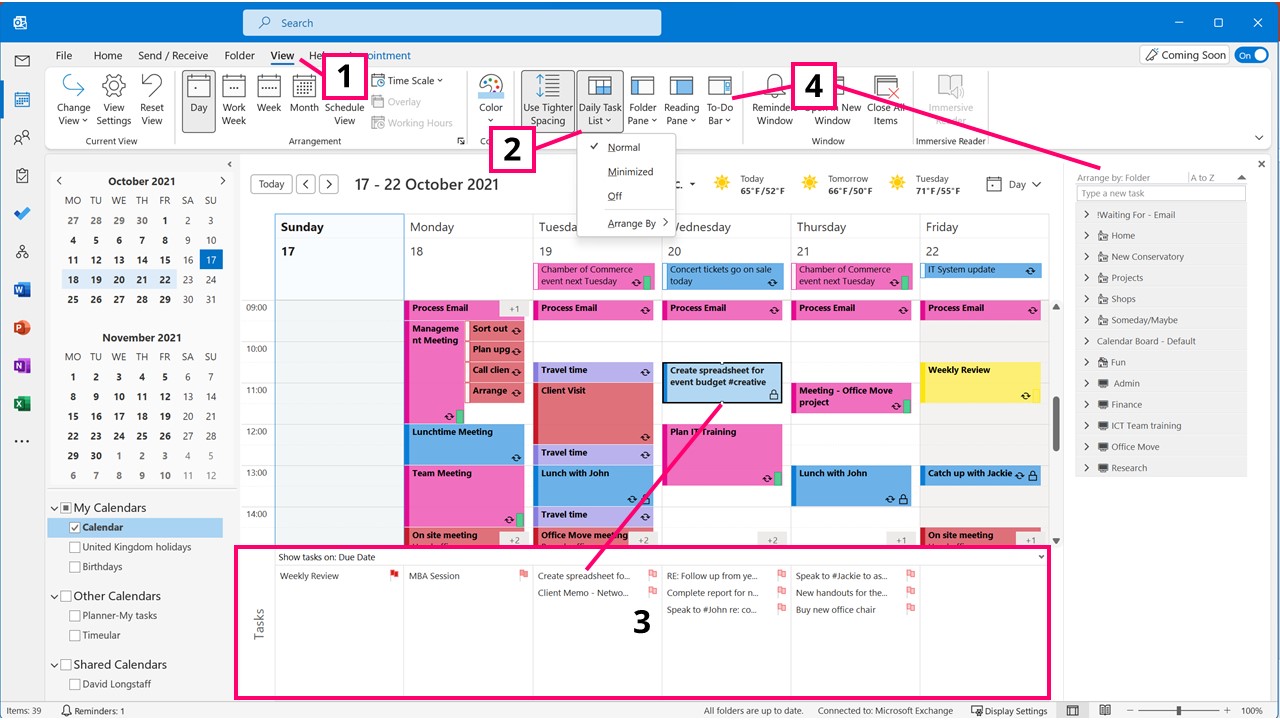
To see your tasks and calendar together, choose the calendar view, then select the View tab (Image 7.1) and assuming you are viewing your calendar, and not someone else’s and as long as you aren’t in the month view, you can now view the Daily Task list (Image 7.2). This shows your tasks at the bottom of the screen underneath their associated due or start date.
You can now drag items into the calendar to make a new appointment from the task, (Image 7.3) which is useful to block time in the calendar. You can also update the due dates of the tasks by dragging them along under the calendar.
You can also view all tasks to the right hand side of your calendar using the To Do Bar (Image 7.4). This view can be adjusted to showing tasks based on their folder and drag and drop also works on this view.
5) Creating Quick Steps
Creating Quick Steps can be useful to carry out multiple actions on an email. It is similar to a Macro but requires no programming skills. This is particularly useful if you have a regular process.
The Quick Steps option is on the Home tab in the email function of Outlook only. Microsoft has provided some sample Quick Steps you may find useful.
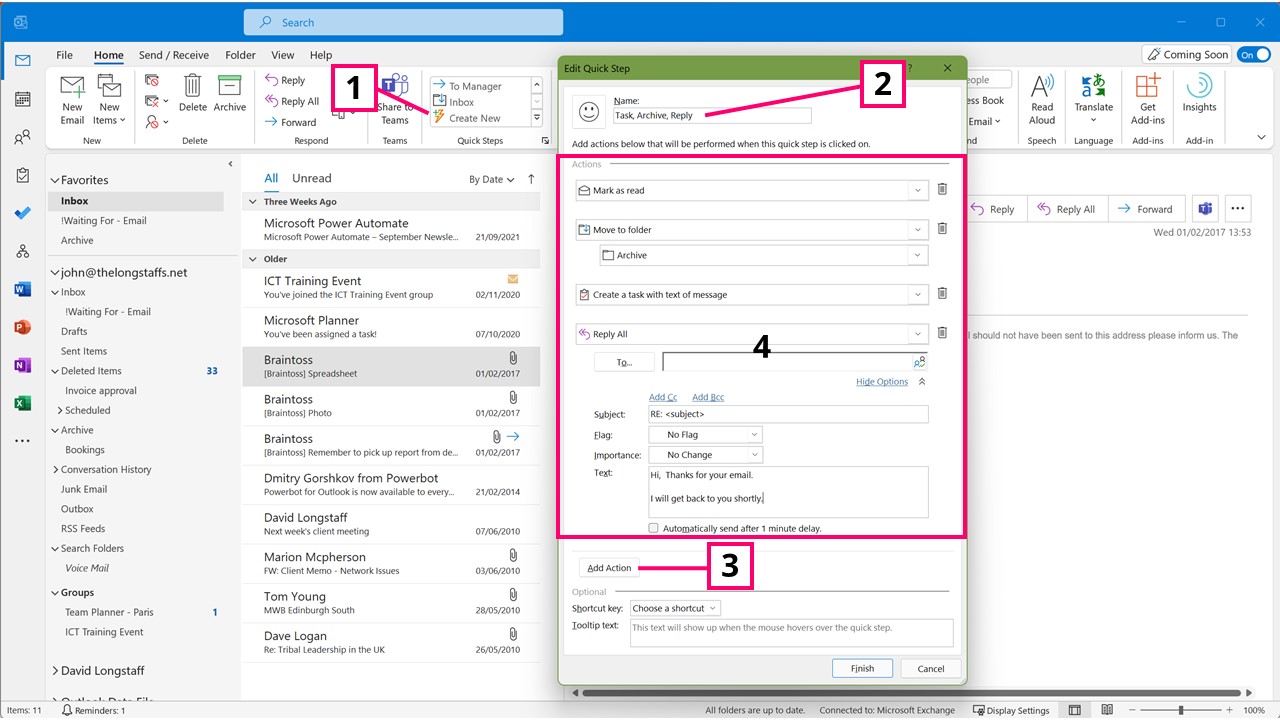
To create your own, choose “Create New” (Image 8.1); then give it a meaningful name (Image 8.2) and change the icon if you wish. Then select a series of actions (you can continue to add more actions (Image 8.3) and select “Finish” when you are happy.
A useful Quick Step (Image 8.4) may be to take an email:
mark it as read,
move it to the Archive folder,
create a task from the email and
send a quick response to the original sender.
Any time you wish to run these processes, simply select the email and choose the Quick Step you.
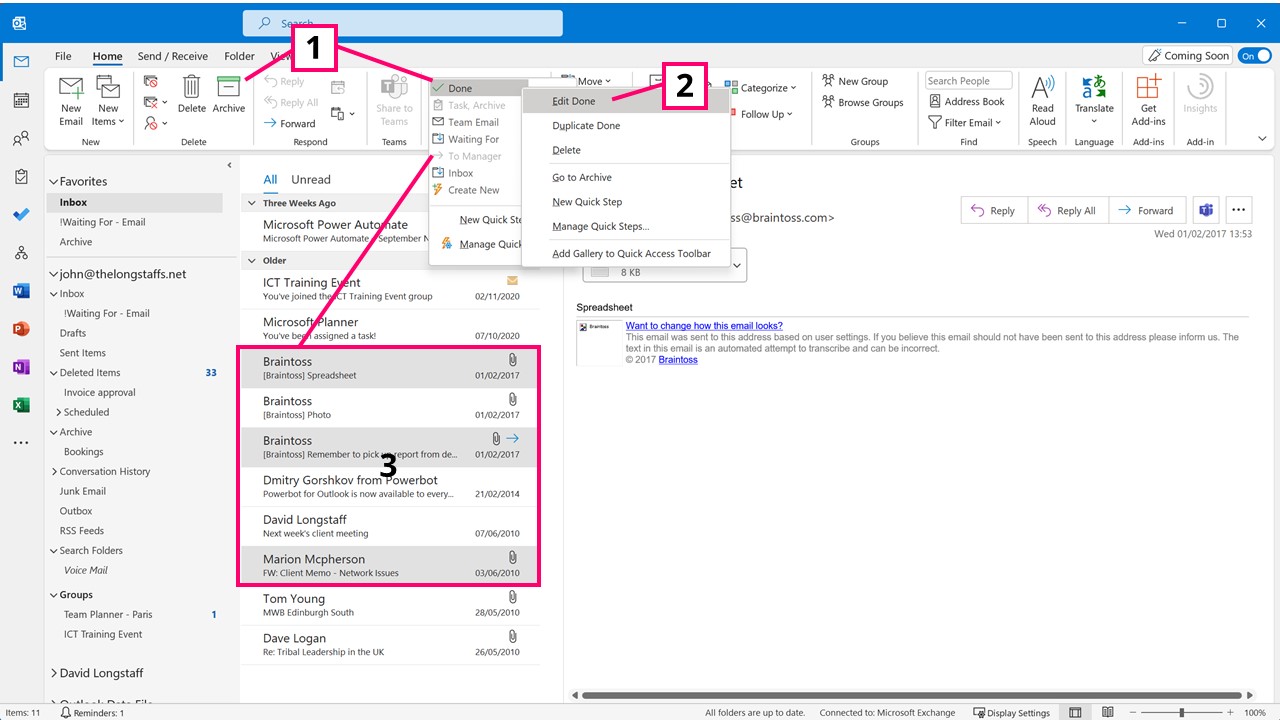
You will see there is a default Quick Step entitled “Done”. This is similar to the Archive button (Image 9.1), but you can customise it by right-clicking on the icon and choose “Edit Done” (Image 9.2). As an aside, some Quick Steps will not be available if you select multiple emails (Image 9.3).
Another useful automation can be created using “Rules.” Rules have the same functions as Quick Steps but work on conditions being met (fully automatic), whereas Quick Steps are triggered only when you select them (semi-automatic).
To access rules, choose File and then Manage Rules and Alerts (Image 10.1). This will list any rules you currently have running and you can create new rules from this screen.
A useful rule can be created to track outgoing emails where you require a response. Anytime you wish to run the following rule, you will add your own email address to the BCC field. The rule would be applied on messages you receive from yourself (Image 10.2) and instruct those emails be moved to something like a “Waiting For – Email” folder (Image 10.3). I also recommend including an exception “where you are in the To or CC box” which omits occasions where you are part of a group, (Image 10.4).
You will then want to check this folder, particularly during the Weekly Review.
7) Integration with Microsoft To Do
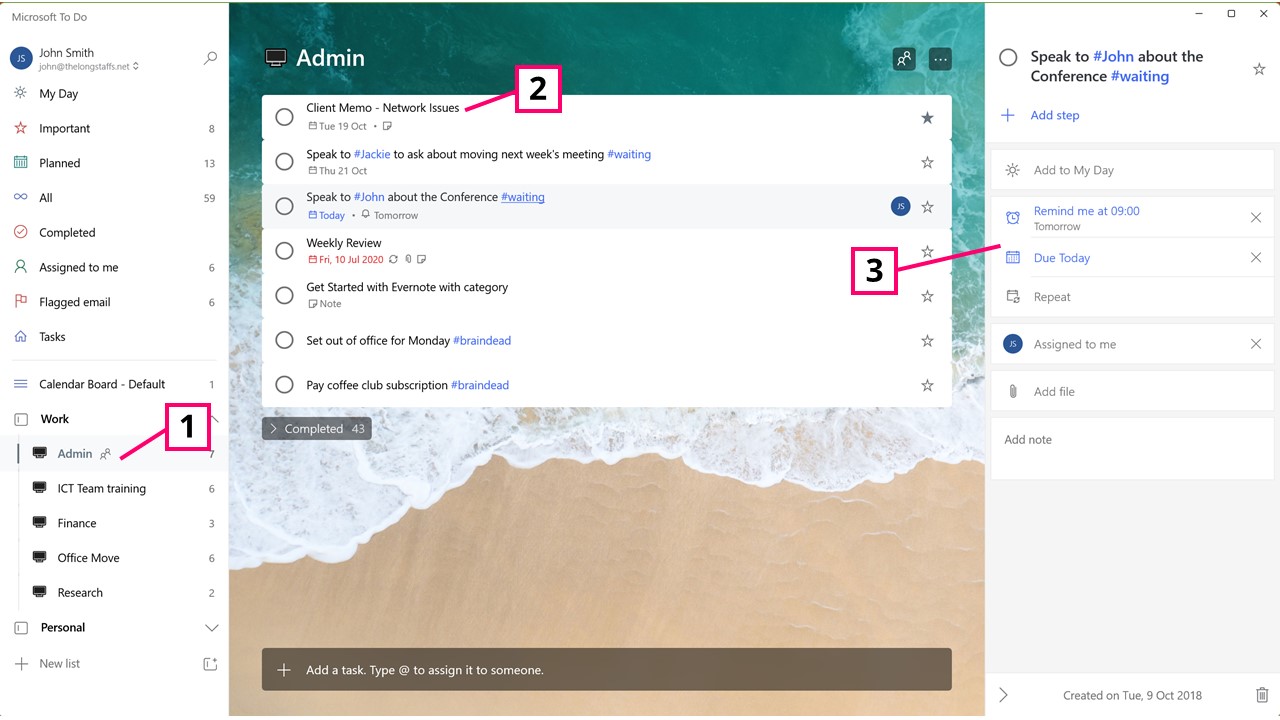
In 2015, Microsoft acquired the company behind of the most popular task management apps available – Wunderlist. The team subsequently built and released Microsoft To Do which since 2019 has automatically synchronised with Outlook Tasks.
Any folder you create in Outlook tasks becomes a list in Microsoft To Do (Image 11.1); any task (Image 11.2) along with its relevant due date, recurrence, priority, etc. (Image 11.3) is also synchronised. Review the Microsoft To Do section for further details.
As Microsoft To Do is available on all major platforms, this will allow you to access your Outlook tasks ‘on the go’.
For blocks of text you may wish to frequently re-use within an email, it is worth creating Quick Steps. These are building blocks that will save time having to find a previous email or keeping drafts.
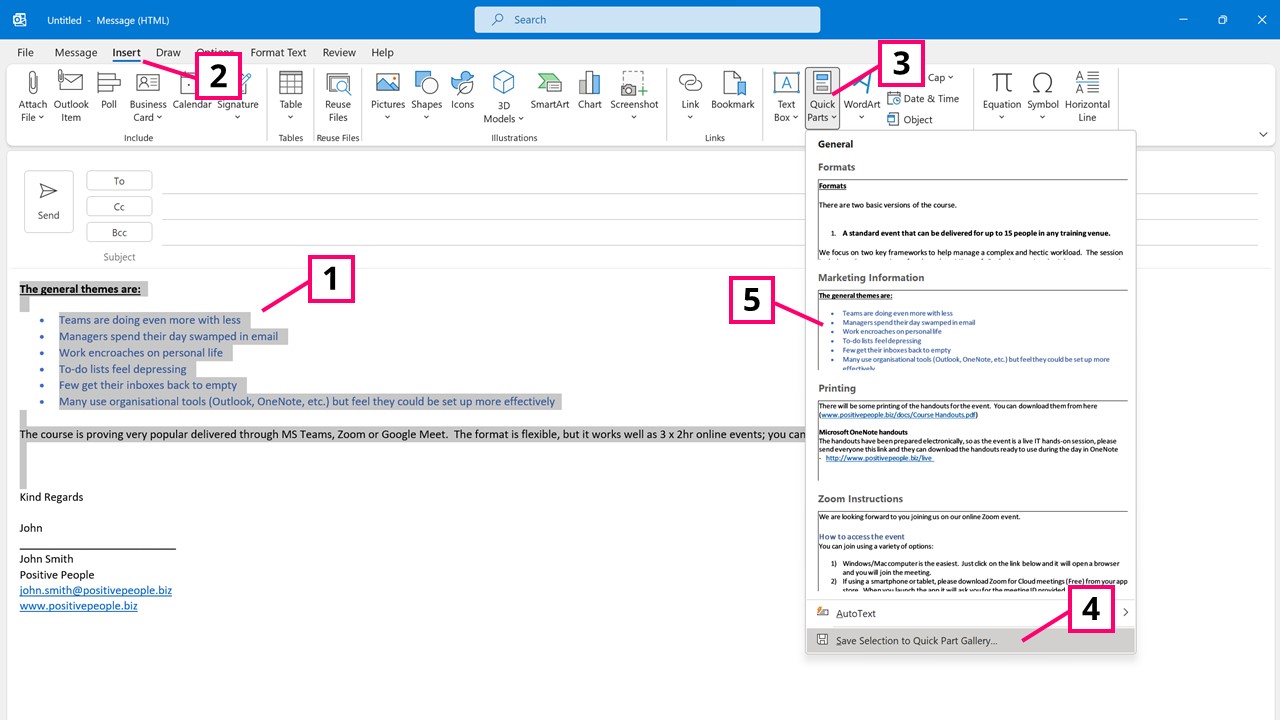
To create a Quick Part, open a new email and add the text you wish to reuse. Include any formatting such as colours, fonts and bullet points. Select the text (Image 12.1) and choose the Insert tab (Image 12.2) followed by Quick Parts (Image 12.3). To save the text, choose the last item, “Save Selection to Quick Part Gallery …” (Image 12.4).
Any time you wish to use that block of text, simply reverse the process – Insert, Quick Parts and the text will be available to drop in (Image 12.5)
9) Email Amnesty
I recommend getting a fresh start fairly early in the implementation of Microsoft Outlook.
To do this quickly, try this 3 stage approach:
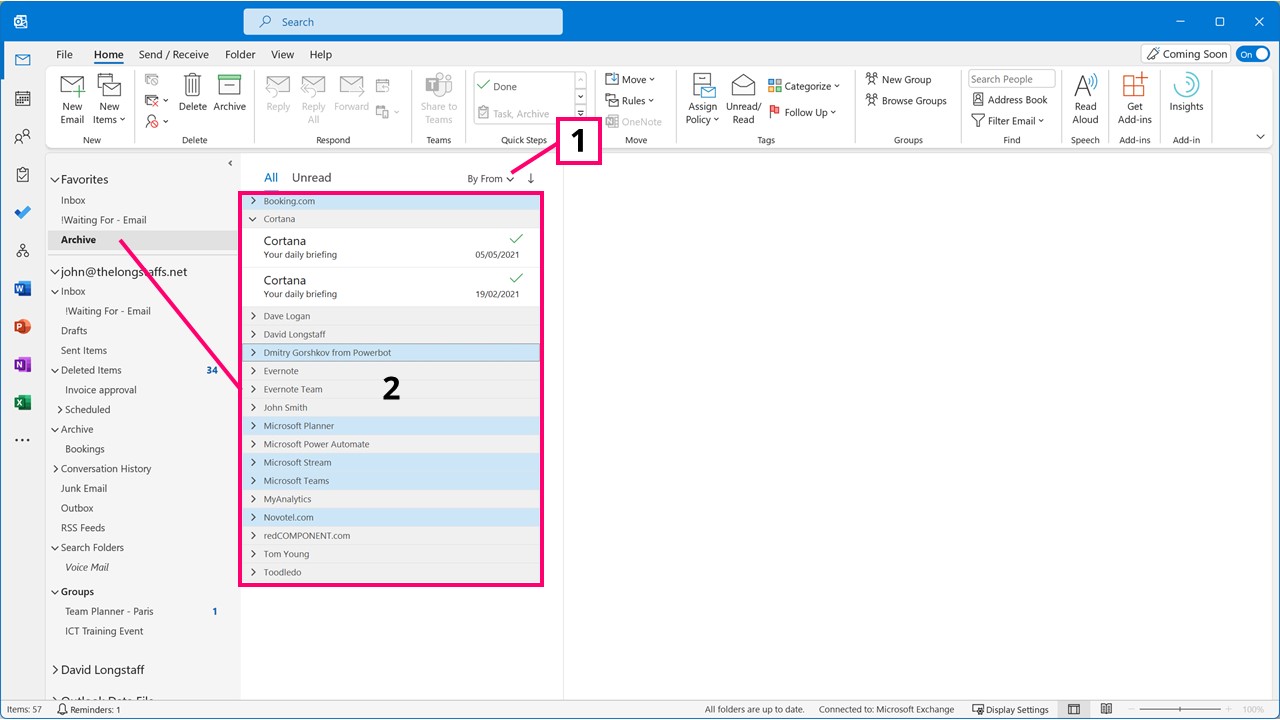
Select all emails which are past their shelf-life, older than a chosen date (Image 13.1). Drag them all into your ‘Archive’ folder. (Image 13.2). You may feel this is a cheat; it is, but you haven’t lost anything, but simply removed the need to process them individually. As an aside, the shelf-life is a lot shorter than you might imagine.
Now change the order of your emails to sorting them by sender (Image 14.1) and you can do the same by dragging emails to the archive folder (Image 14.2) where they come from email addresses that will have no actions.
The final stage is to re-sort your emails by date order and I can’t help you with the rest, they will need to be processed (See 3 – Making Emails into Tasks and 5 – Using Quick Steps).
This will allow you to create a quick email amnesty and start fresh.
Outlook on the Web was historically a very poor solution especially when compared to its Windows counterpart. However, in the recent times, Microsoft has invested substantial time and effort to the extent that Outlook on the Web has some great features.
Linked to Outlook is Microsoft Viva (Insights); your organisation may already have deployed it. One of its many features is the ability to delay all internal emails to only reach colleagues inboxes when they are at work.